
Saturday, December 24, 2011
Merry Christmas!!!
Merry Christmas everyone? I hope you all have a wonderful day and have lots of fun with friends and family! Please remember what this day is for! What is everyone doing on Christmas?
Monday, December 19, 2011
New quilt!
Hello everyone! Bry and I just got done making our first quilt!! We LOVED how it turned out and it was so much fun! We will post pictures as soon as we can! Has anyone made any new projects lately?
Sunday, December 18, 2011
Hello!!!
Hello everyone!! Just wanted to let you all know that we did not fall off the face of the earth!!! We have just been so busy with the holidays! Just wanted to tell everyone HI and we will be back soon! Has anyone been doing any holiday baking. wrapping presents, visiting family, or any new projects? I just got done making my first quilt top, and I think that it turned out pretty good for being my first one! Pictures to come when it is completed to a new blanket!
Cork
Cork
Tuesday, November 29, 2011
Hair Bow
Here is a quick and easy bow you can use in a little girls hair or to add a lil' something to a gift.
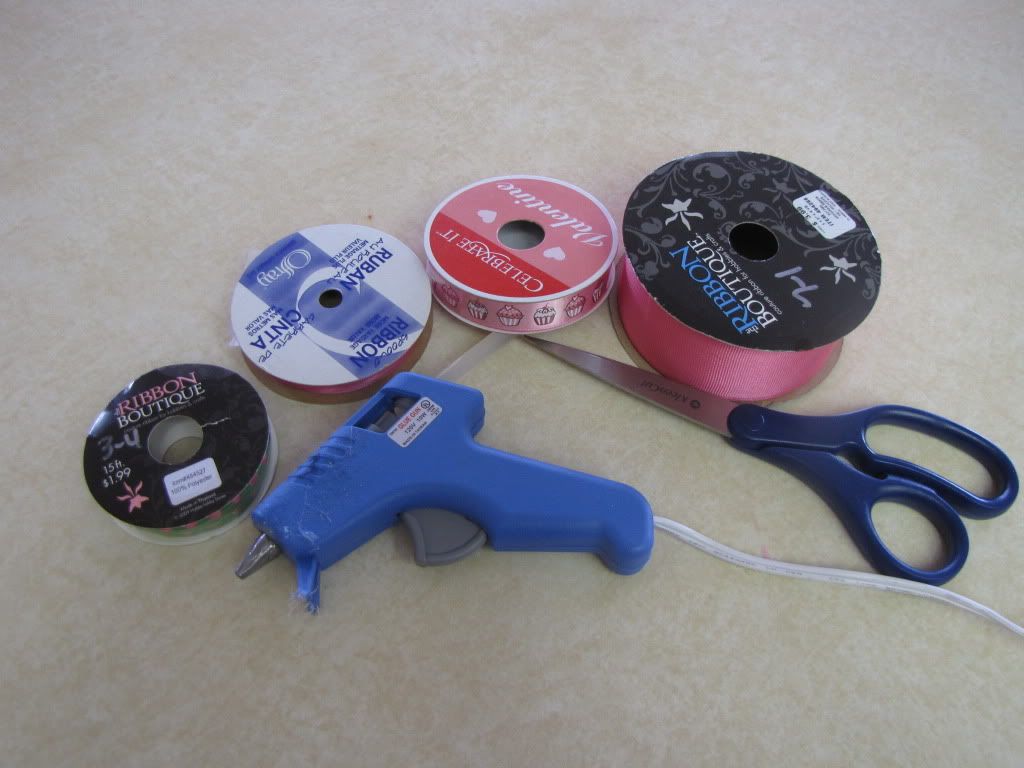
Items Needed:
Three or four different coordinating ribbons
Hot glue gun and glue
Scissors

Step 1:
Cut 2 pieces of your widest ribbon. About 10 inches long.

Step 2:
Glue the ends together in a loop, for both of the ribbons. Use a thin line of glue.
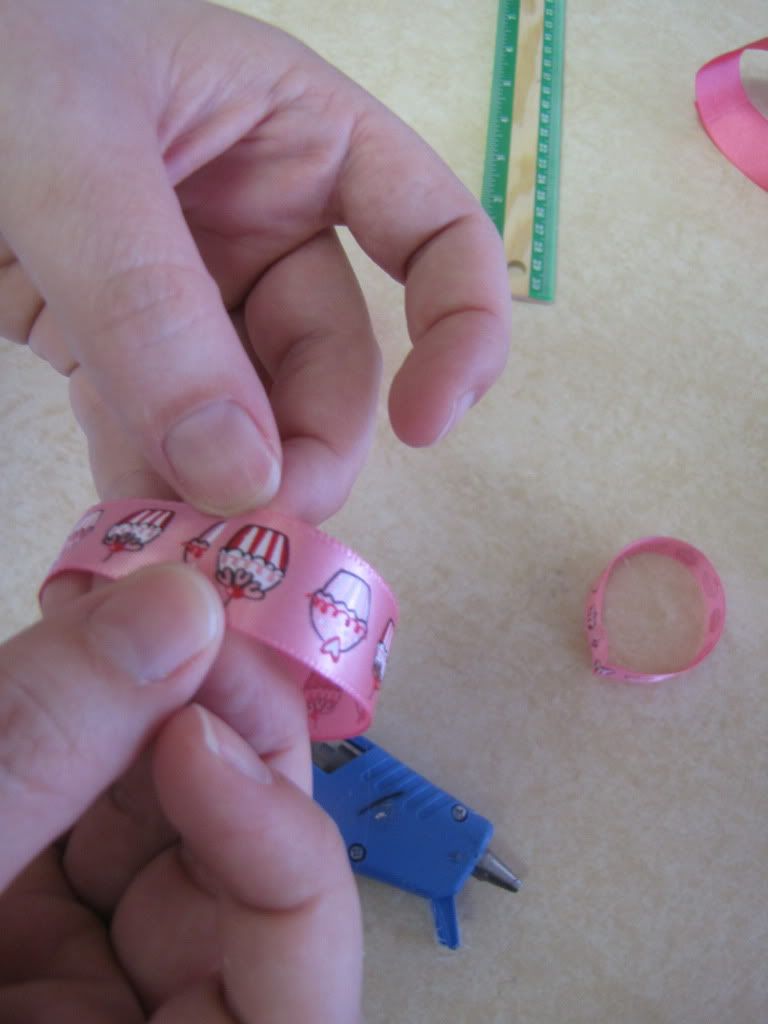
Step 3:
Cut the next ribbon 7 inches long. (You will need 2 pieces.)
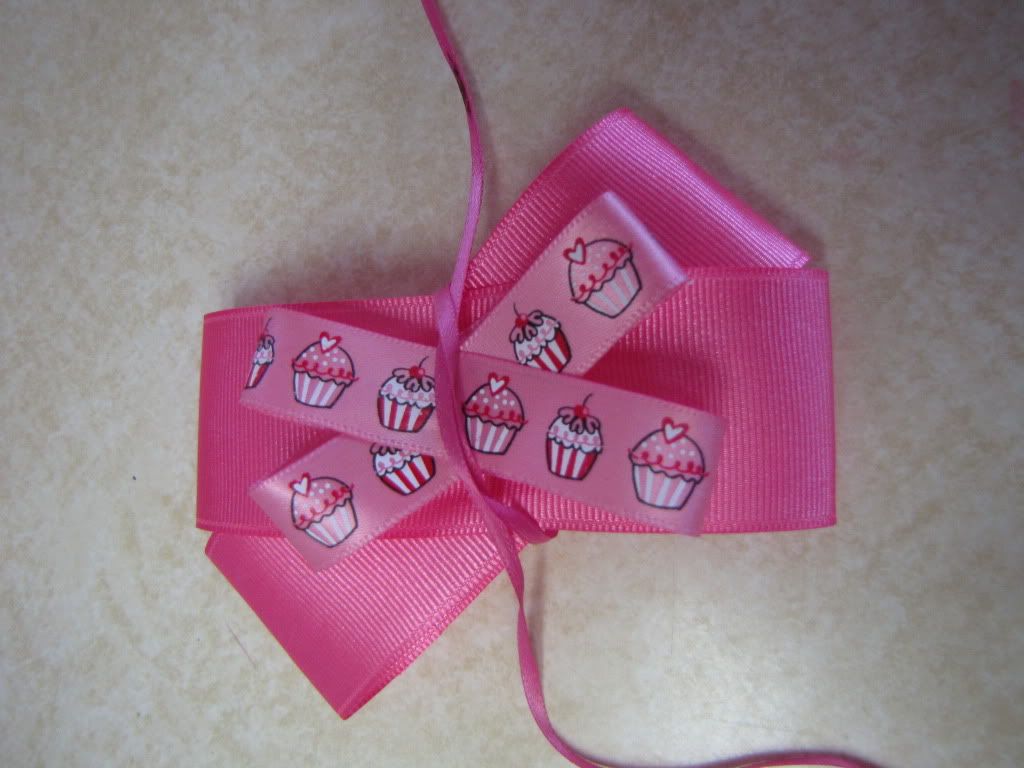
Step 4:
Take both of the ribbons and make an X shape and put the smaller ribbon on top of the larger ribbon. Take a small piece of ribbon and tie it tight against the ribbon.
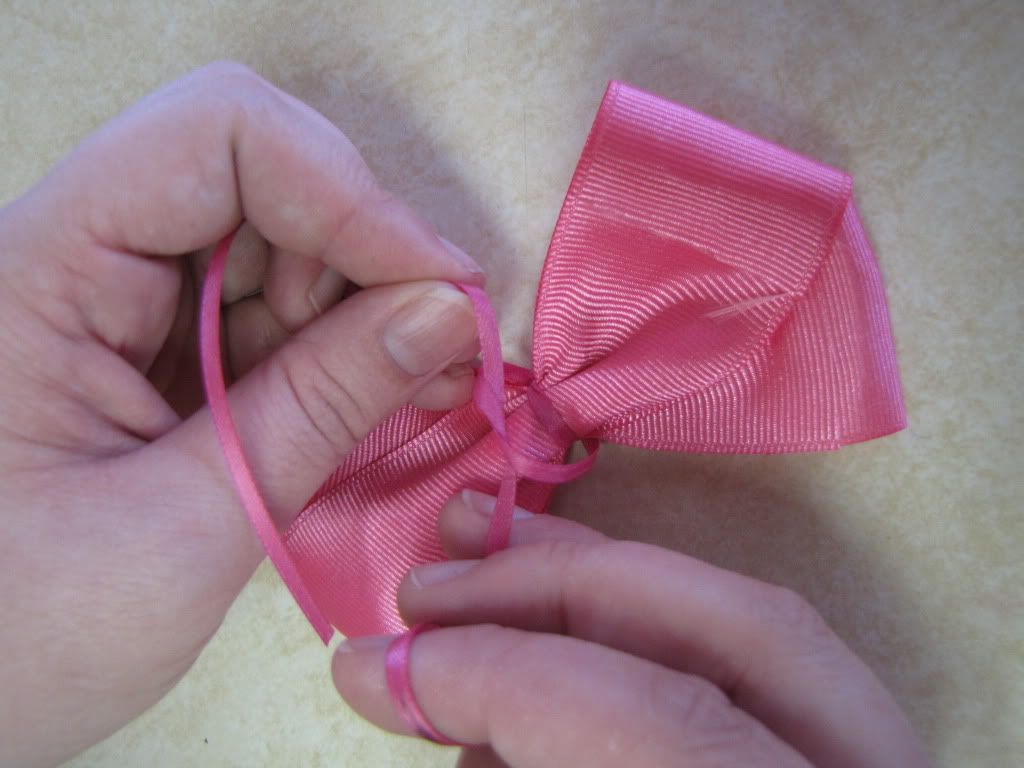
Step 5:
Tie a knot in the back to help keep it secure.
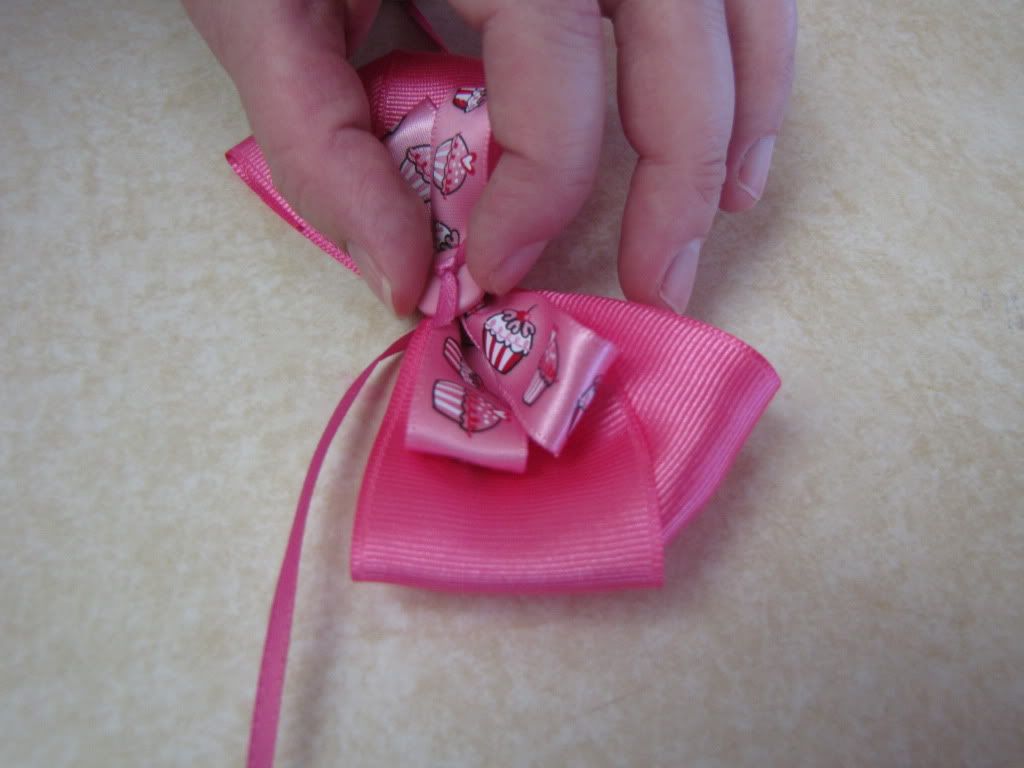
Step 6:
Add an embellishment to the middle, and fluff the bow, and you have a cute and simple little bow!!
Sunday, November 27, 2011
Elf on the Shelf
Hey everyone!!! Well, with turkey day behind us it is time to move forward into another Christmas Season!!! The tree is up and it is time to start decorating the rest of the house!!! I love pulling out all of our decorations and the memories that come with it. I love seeing the kids excitement as the put their ornaments on the tree. Traditions are such an important part of the holiday season. I love our old traditions and I love creating new traditions. A couple of days ago I was visiting with my sister-in-law and she was telling me about an awesome book. Many of you may have heard about it, but for those who haven't yet, I am speaking to you!!! It is called The Elf On The Shelf.
Here is the plot of the story found here at Wikipedia.
Every day from Thanksgiving until Christmas Eve, each family's scout elf watches over the children and then at night, once everyone goes to bed, the elf flies back to the North Pole to report back to Santa about what activities, good and bad, took place throughout the day. Before the family wakes up each morning, the scout elf flies back from the North Pole and hides. By hiding in a new spot each morning around the house, the scout elf and the family play an on-going game of hide and seek. The Elf on the Shelf explains that elves get their magic by being named. In the back of each book, families have an opportunity to write their elf's name and the date that they adopted it. Once the elf is named, the scout elf receives its special Christmas magic which allows it to fly to and from the North Pole. However, the magic might go if touched, so the rule for The Elf on the Shelf states: "There's only one rule that you have to follow so I will come back and be here tomorrow: Please do not touch me. My magic might go, and Santa won't hear all I've seen or I know." Although families aren't supposed to touch their scout elf, they can talk to it and tell it all their Christmas wishes so it can report back to Santa accurately.
Doesn't it sound FUN?!!!!!!!!!!!!!!
Ok, so to help you start this tradition I am going to list some fabulous links.
The official Elf On The Shelf site is a lot of fun. On this site you can visit and explore the North Pole. When you visit different parts of the North Pole their are activities, games, coloring pages and more!!!!
If you want ideas for your Elf, visit Blossom Bunkhouse with 101 Elf On The Shelf ideas. CUTE stuff and will help you keep the traditions going!!!
If you use Pinterest, just type in Elf On The Shelf and there are sooooo many ideas.
If you need to buy a copy of the book Amazon has several different packages that contain both the book and the elf with other bonus products in the packages.
Now that this great idea has been brought to my attention, I am noticing the Elf On The Shelf EVERYWHERE(there is even a movie)and I am looking forward to enjoying it with my children.
Lets go CREATE some amazing traditions!!!!!!
Love Bry
Monday, November 21, 2011
New Blog
Hey Everyone!!! I have be on vacation and then we have been dealing with some sickness in our house. So there hasn't been much happening in blog-land for me the past couple of weeks. Sorry, but we will get back to it and you will see some more creAcipes real soon.
Today I just want to post a new blog that our sister-in-law recently launch. Cori is fun, creative and an inspiration to all who know her. So if you don't know her yet, I want to invite you to get to know her through her blog Run Your Legs Off. Lookin' forward to seeing her blog progress and the information that is going to come from it. Can't wait to make the Shrek smoothie she has posted!!!
Keep creating!!!
Love, Bry
Tuesday, November 15, 2011
Hello!!!
Hello everyone!!! Just wondering what everyone is up to today??? Bry and I are working up some really fun projects!! Can't wait to share them with you all! Have a great day eveyone!!!
Cork
Cork
Saturday, November 12, 2011
Distressed Candlesticks
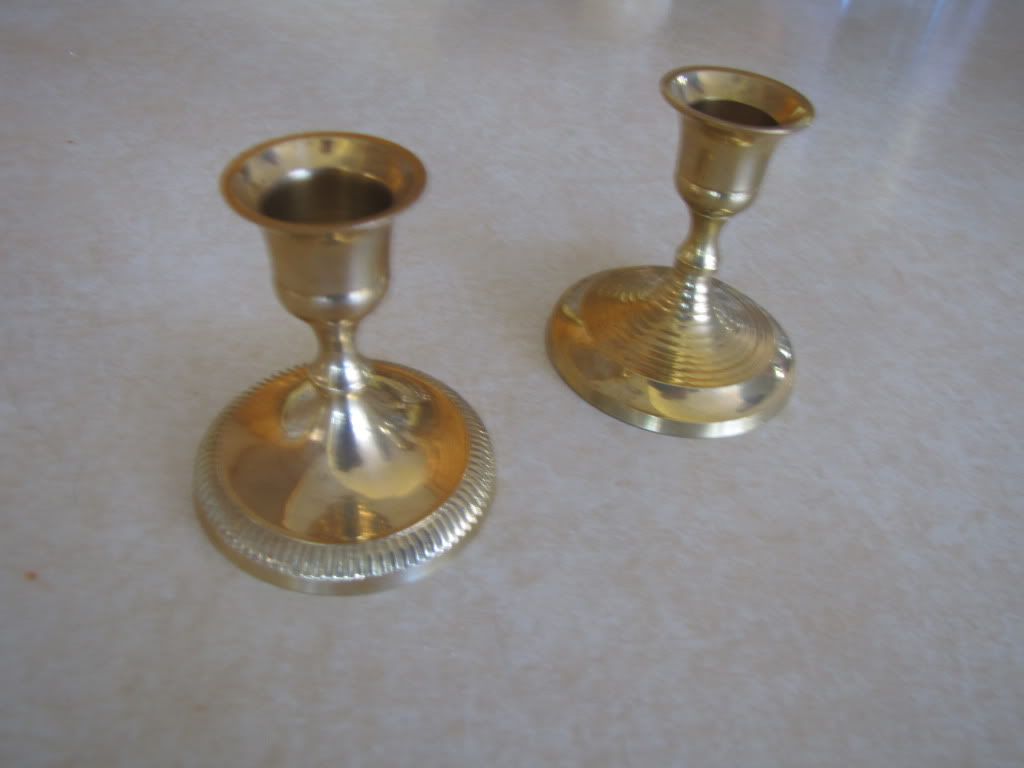
Here's some more thrift store candlesticks. These are super cute but...they needed a new life. So we washed them up and removed some of the dust from them.
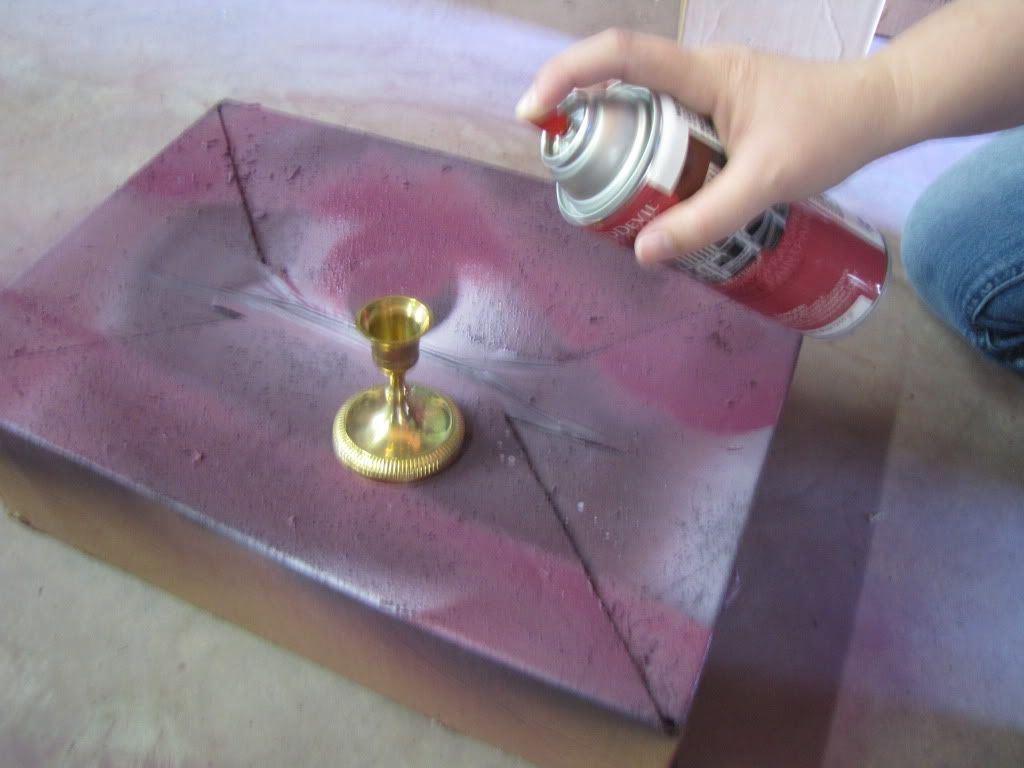
Then we spray painted them.
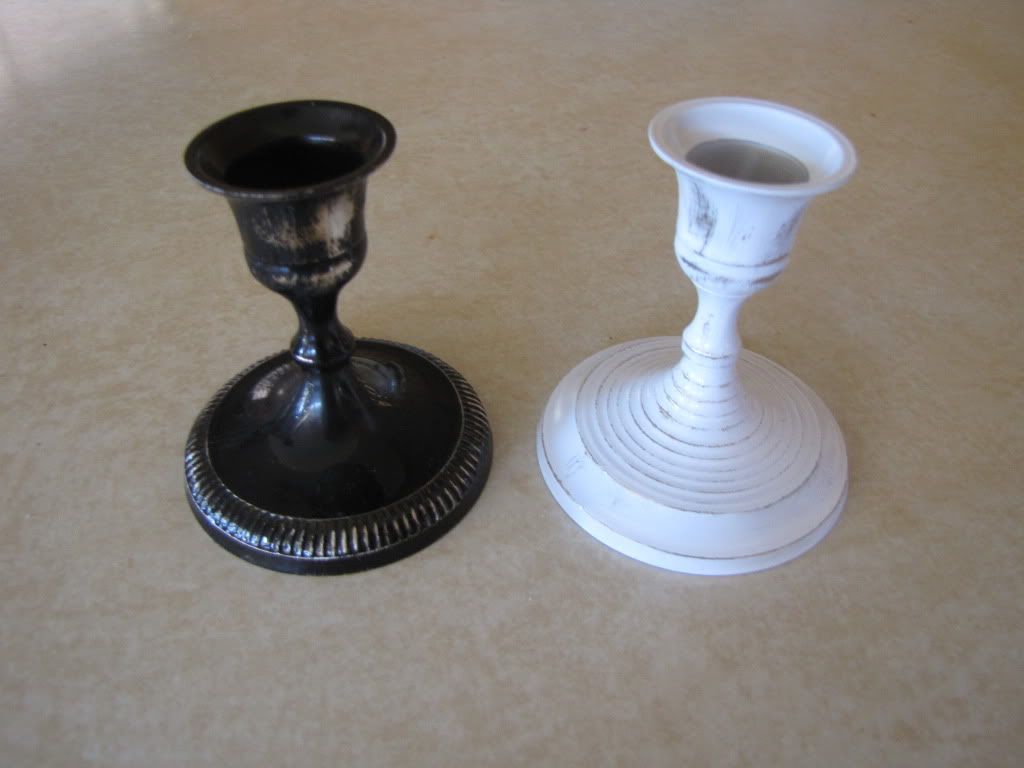
Sandpaper them lightly.
That's all there is to it and they are amazingly cute!!!!
Tuesday, November 8, 2011
Mod Podge Tip!
Hello everyone! Here is a quick little tip for you all! When using mod podge before you apply your paper to the surface give the back of the paper a light spritz of water. It will keep the paper from bubbling! You may see a few little bumps but after a while they all go down! It works I swear!!
Thursday, November 3, 2011
Quick Tip
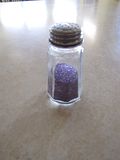
This is something simple that will make your crafting life so much easier.
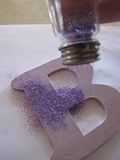
Put your glitter in a salt shaker and you can just shake it onto your next project!!!
Monday, October 31, 2011
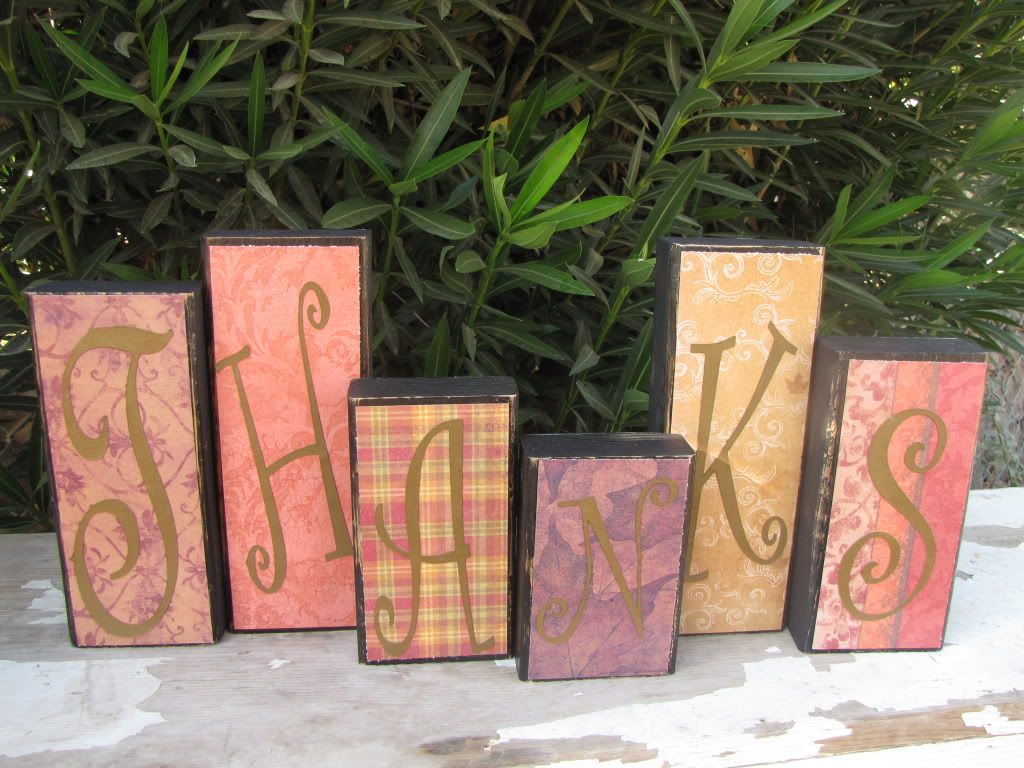
Wicked Blocks
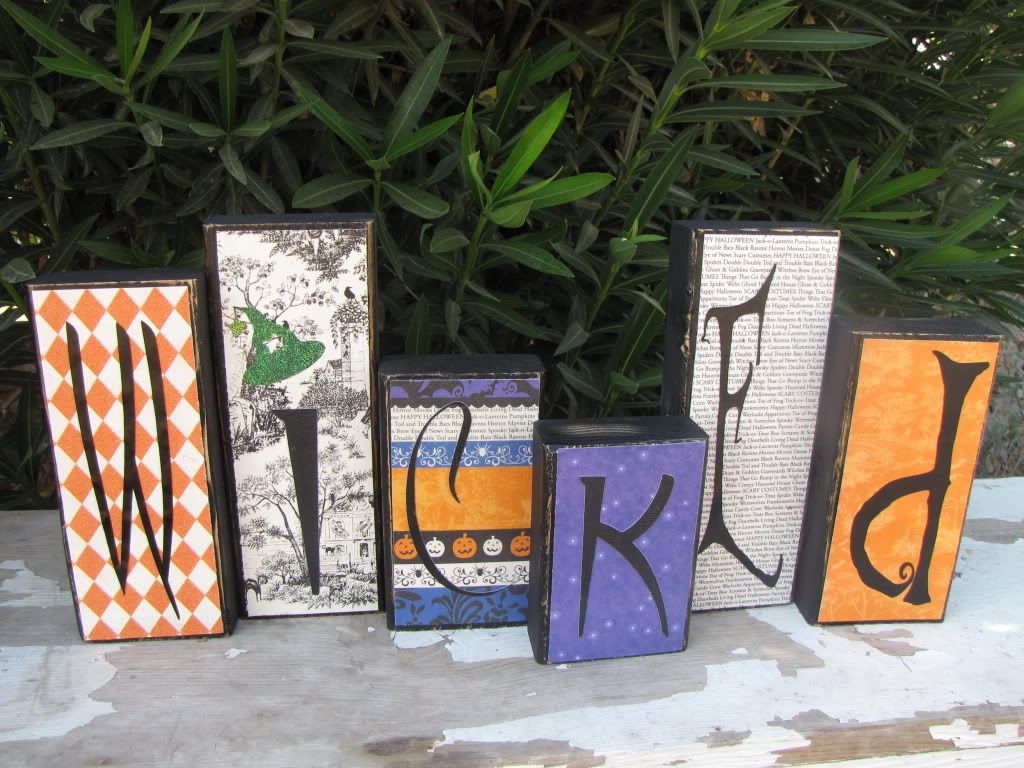
HAPPY HALLOWEEN!!!
Here is a fun project that Cork made one afternoon with a couple of friends. Simply cut some wood in various sized. Paint the blocks black and Mod Podge some cute patterned paper onto the blocks. Cut your letting out and Mod Podge it onto the blocks.
You can enjoy one side for Halloween and the other for....
THANKSGIVING
Tuesday, October 25, 2011
Mason Jar Luminaries
We just LOVED the way these turned out!!! Use them for weddings, bridal showers, or even use at a summer barbeque.
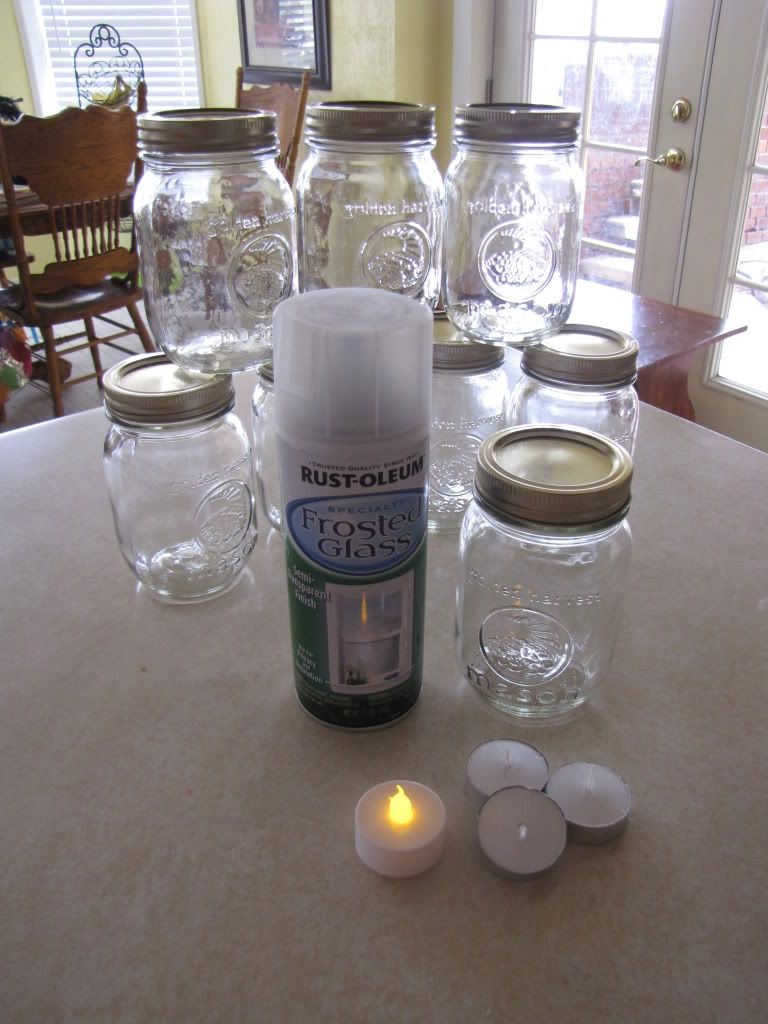
All you need for this project is:
Mason Jars
Spray paint--we used Frosted Glass, white, and plum
A clear topcoat/sealer
Tea lights--either regular tea lights or battery operated
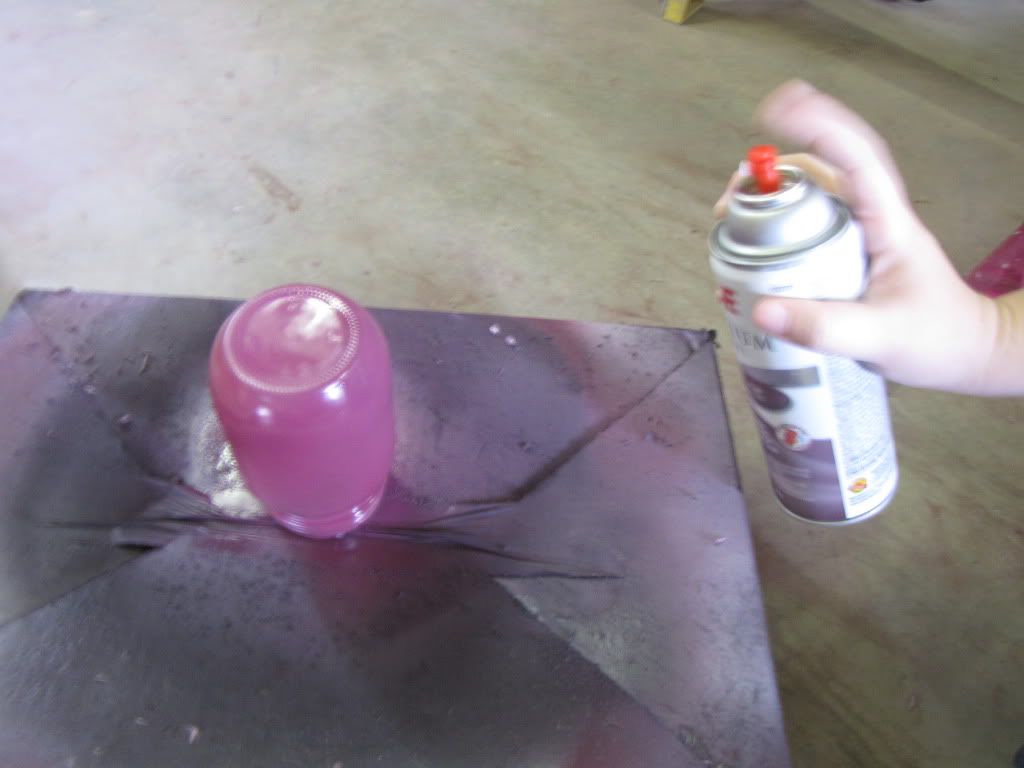
Spray a light coat.

When paint is dry, add your top coat/sealer. Add some pretty embellishments if desired. These are so pretty when lit.
Monday, October 24, 2011
Monster Jars
Here is a fun project that Cork made for Halloween. It is fast, easy, and inexpensive. Just what we Love!!!

You can find the tutorial Cork used here.
Sunday, October 23, 2011
Pumpkin Specimen Art
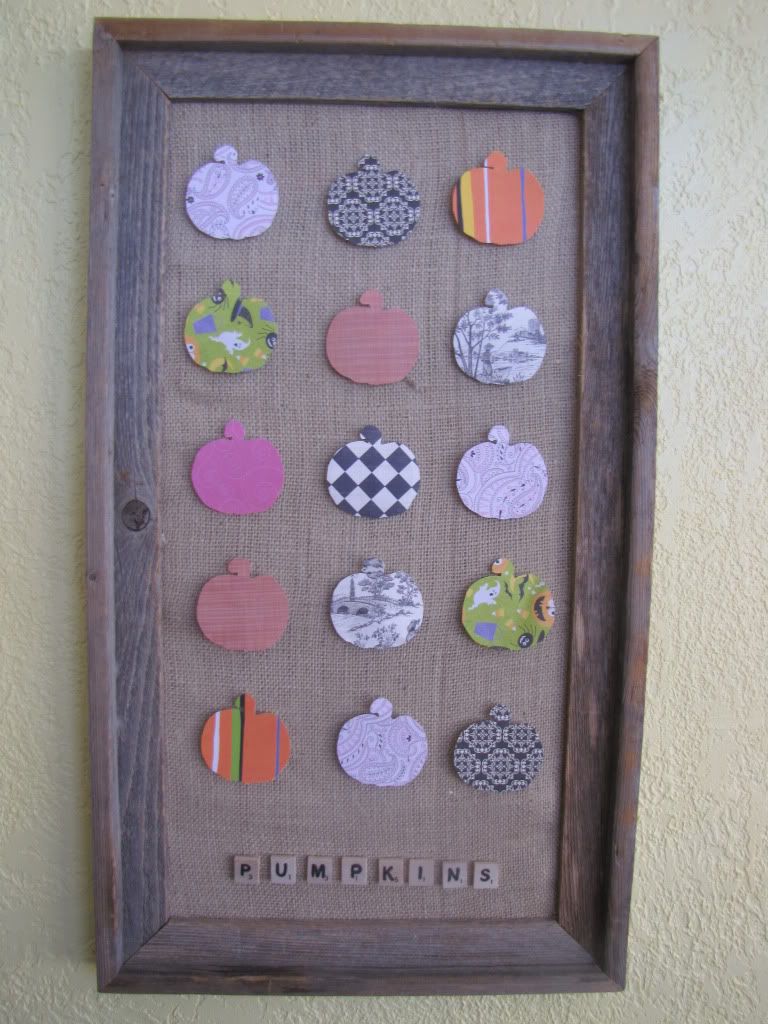
Cork's at it again, makin' cute little projects!!!
Here is the link to the tutorial she used to create this cute project.
Saturday, October 22, 2011
BOO Garland
Here is a quick little afternoon project that Cork whipped up.
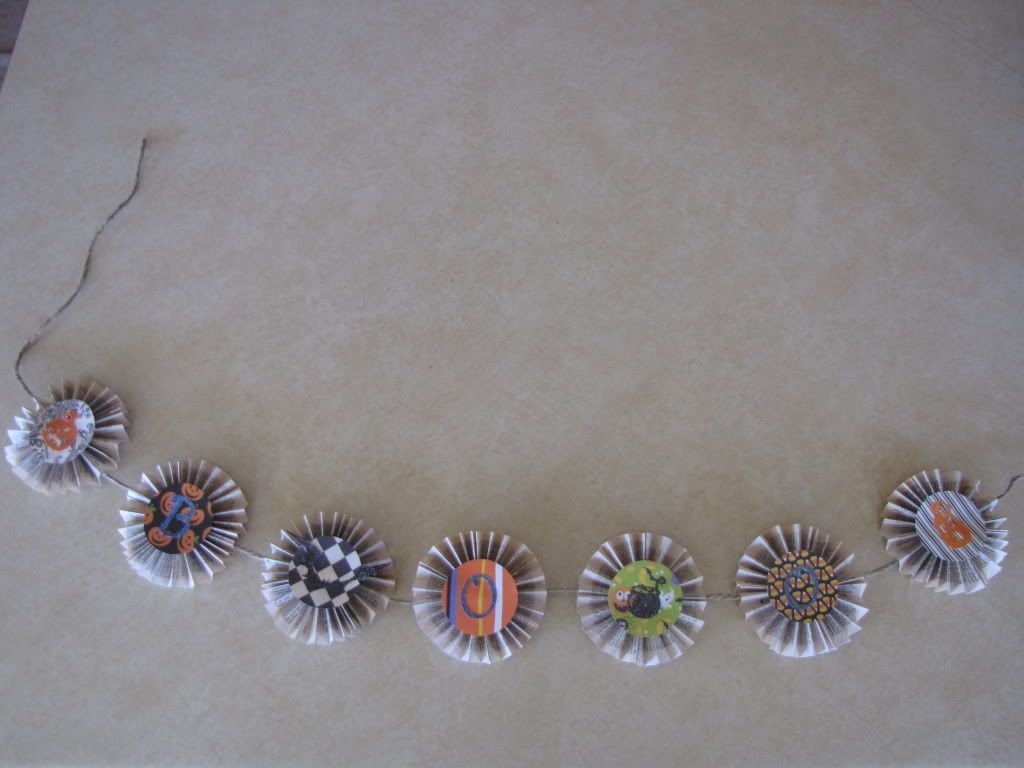
The picture makes it hard to tell, but the garland reads BOO with a cute little Halloween die cut placed in between each letter.
Add a little pizzazz with glitter!!!
An inexpensive project that will add a little spook to your fireplace mantel!!!
Friday, October 21, 2011
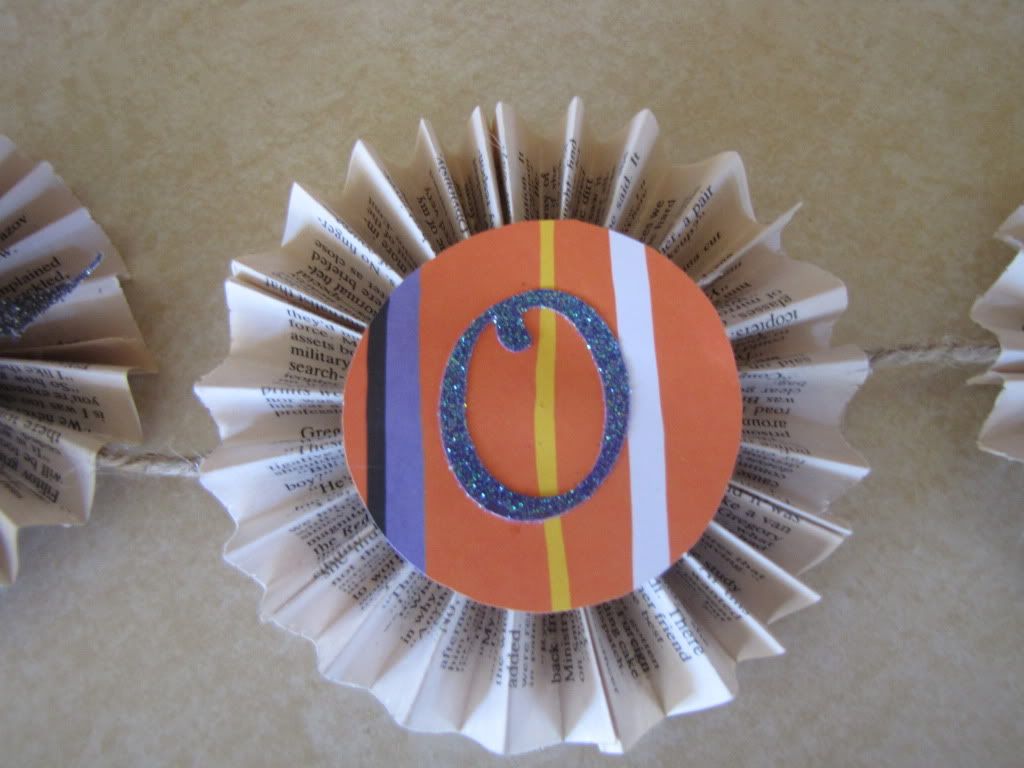
Book Page Fanning
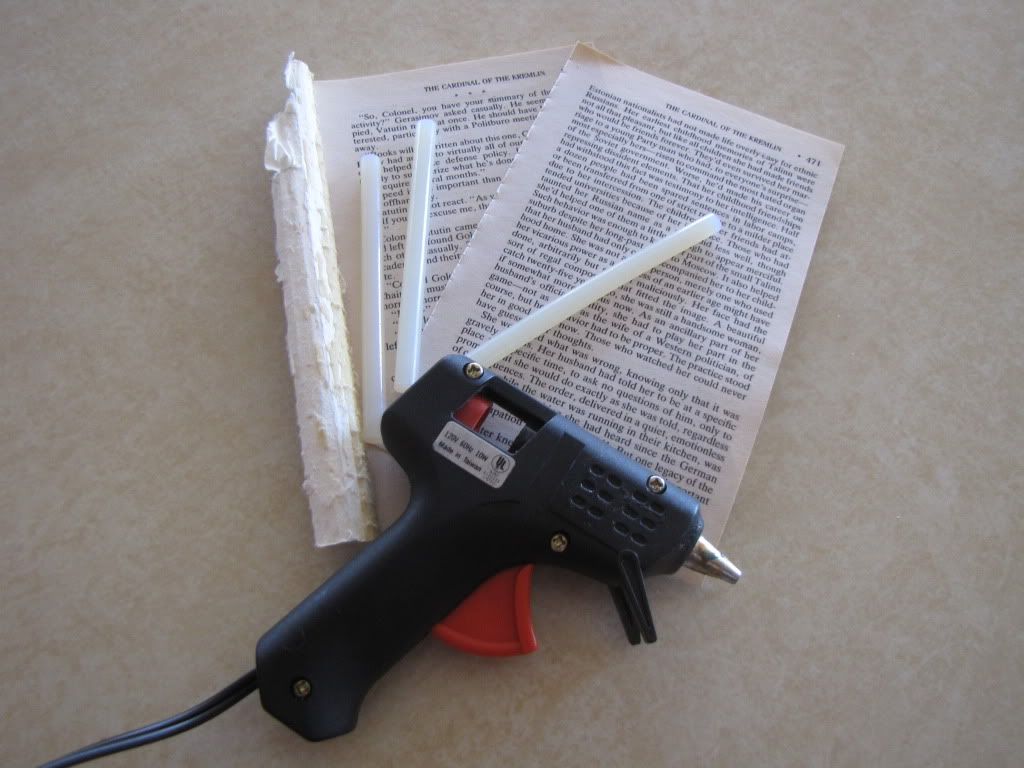
Just grab your glue gun and some pages from an old book and you are ready for this project
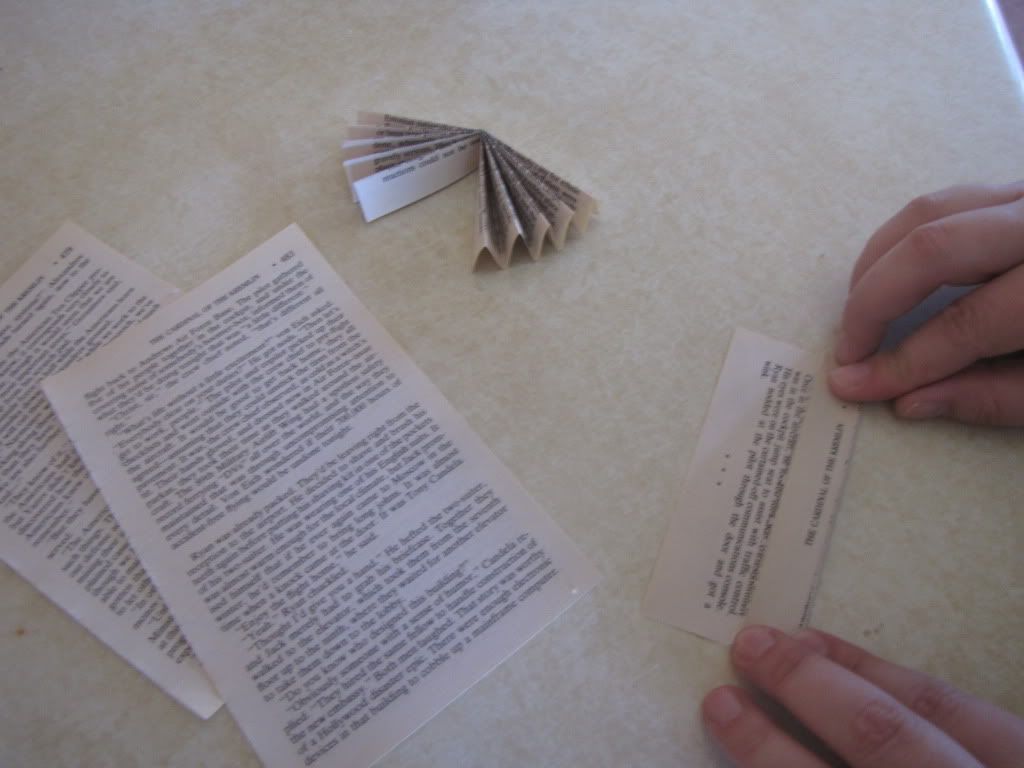
Begin by folding your pages like a fan.
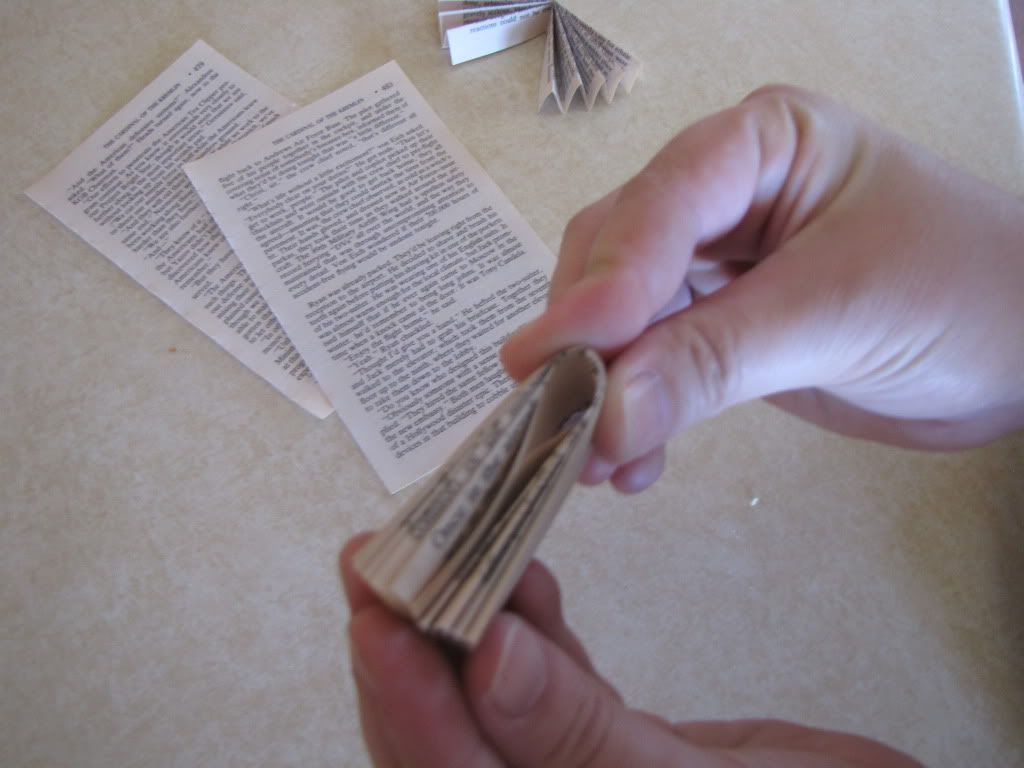
Next fold that in half
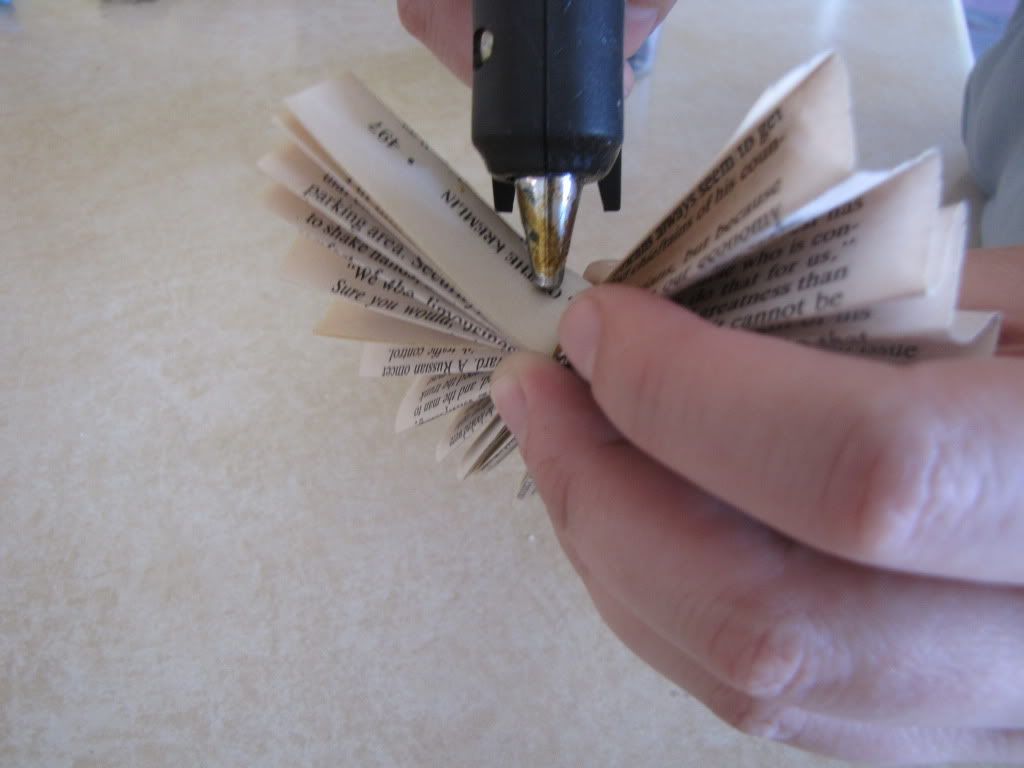
Add a little glue.
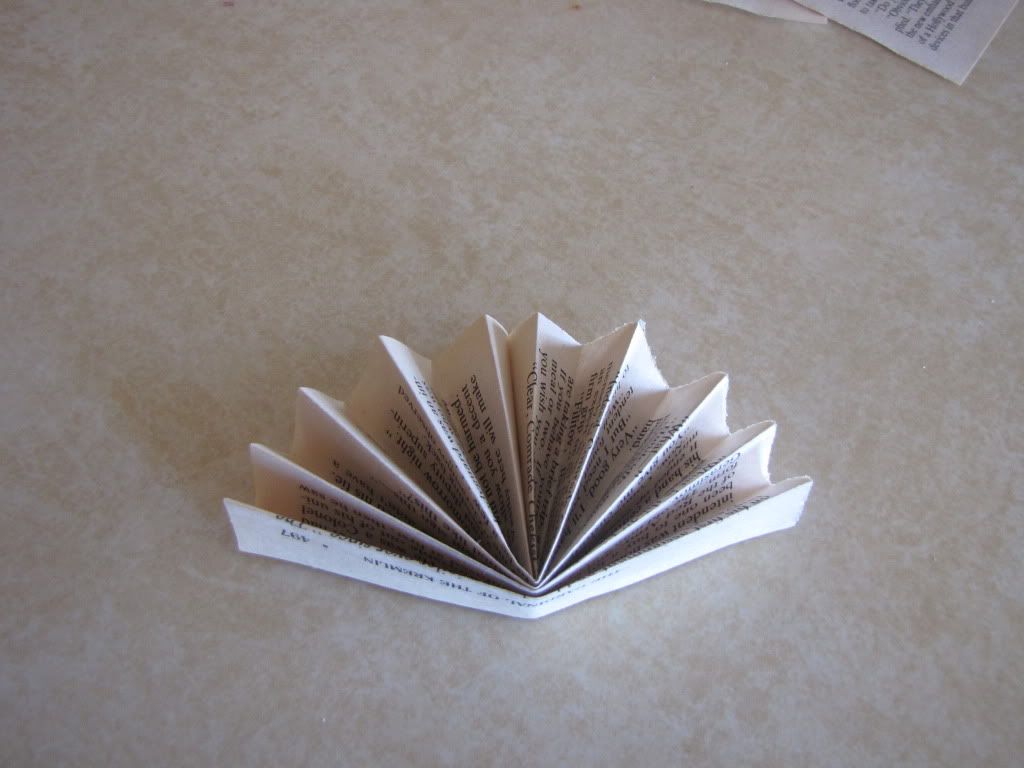
You should now have what looks like this. Make 3 of these.
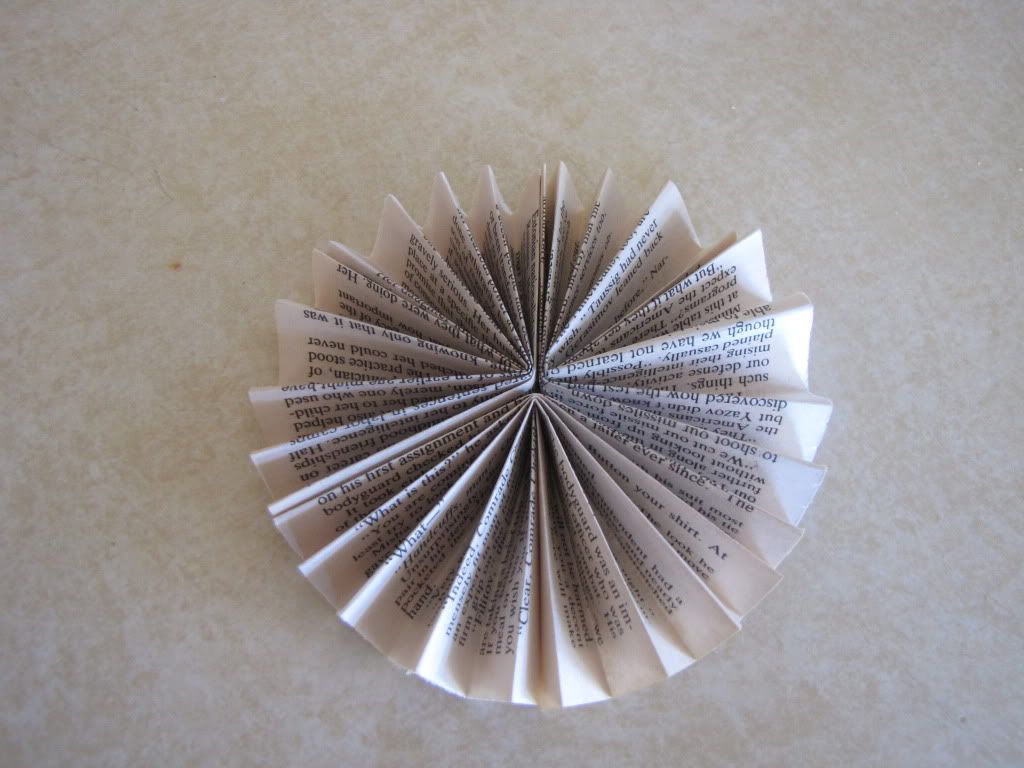
Glue the three together and you have a full circle. Quick and simple. This can be used in so many ways. Just get Creative!!!!
Thursday, October 20, 2011
Turn a Mason Jar into...
A soap dispenser!!! Try this super easy project.
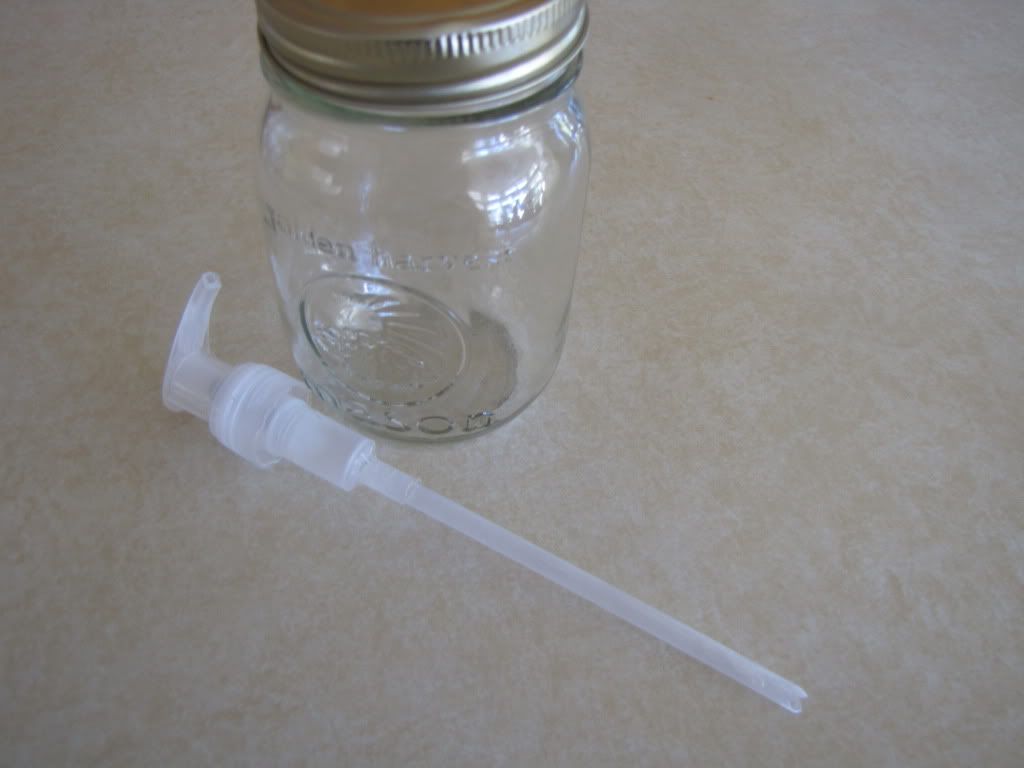
All you need it:
Mason Jar
Soap Pump(ours was just recycled)

Just drill a hole in the lid of your jar. Make sure that it will fit the pump tightly. Glue if needed.

Enjoy!!!
Wednesday, October 19, 2011
Mason Jar Ideas
I(Bry) told you in the previous post that I love mason jars!!! So I a just want to share some fun mason jar ideas.

We are a Home-schooling family so our table is usually covered in books, pens, markers, etc. So in order to help me stay somewhat organized, my mason jars came to the rescue. No typical centerpiece for me, mine is made out of school supplies and mason jars. I also used an old puzzle to add a little more color.

Here is a link to The Pioneer Woman's love of Mason Jars.
We are a Home-schooling family so our table is usually covered in books, pens, markers, etc. So in order to help me stay somewhat organized, my mason jars came to the rescue. No typical centerpiece for me, mine is made out of school supplies and mason jars. I also used an old puzzle to add a little more color.
*******
Here's a fun idea for ya!!
I love this Ideas!!! So simple and you can use it for weddings, baby showers, reunions, basically any event you want!!
The idea is from The Knot
Here is a link to The Pioneer Woman's love of Mason Jars.
Lookin' Forward to sharing more fun ideas with you.
Please feel free to share your ideas with us!!!
Monday, October 17, 2011
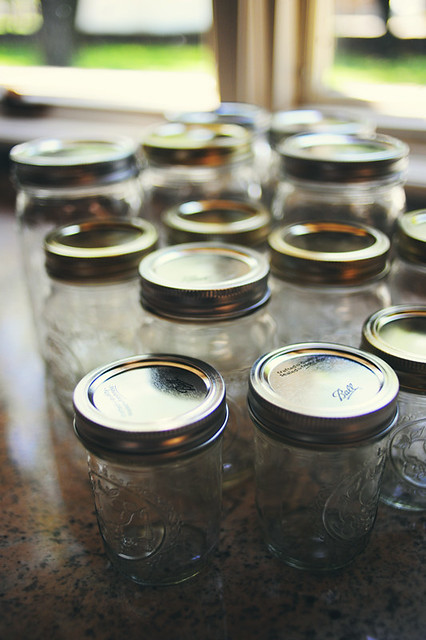
Mason Jars
Mason Jars are one of my favorite things in the whole wide world!!! I(Bry) remember being little and watching my mom and grandma can fresh foods from our garden. I loved waiting and listening to the seals pop. Now that I am grown I when my mom and I can spend the weekend canning. I have to admit that I still get all giddy when I hear the sound of the seals popping. Anyone who has canned before knows the sound!!! The sound of knowing that all your hard work will be enjoyed for months to come!!! So in honor of the timeless Mason Jar, we will feature a plethora of Mason Jar ideas. We will makes some of the projects as well as feature other great ideas that we have found on various blogs.
ok---So here is idea #1
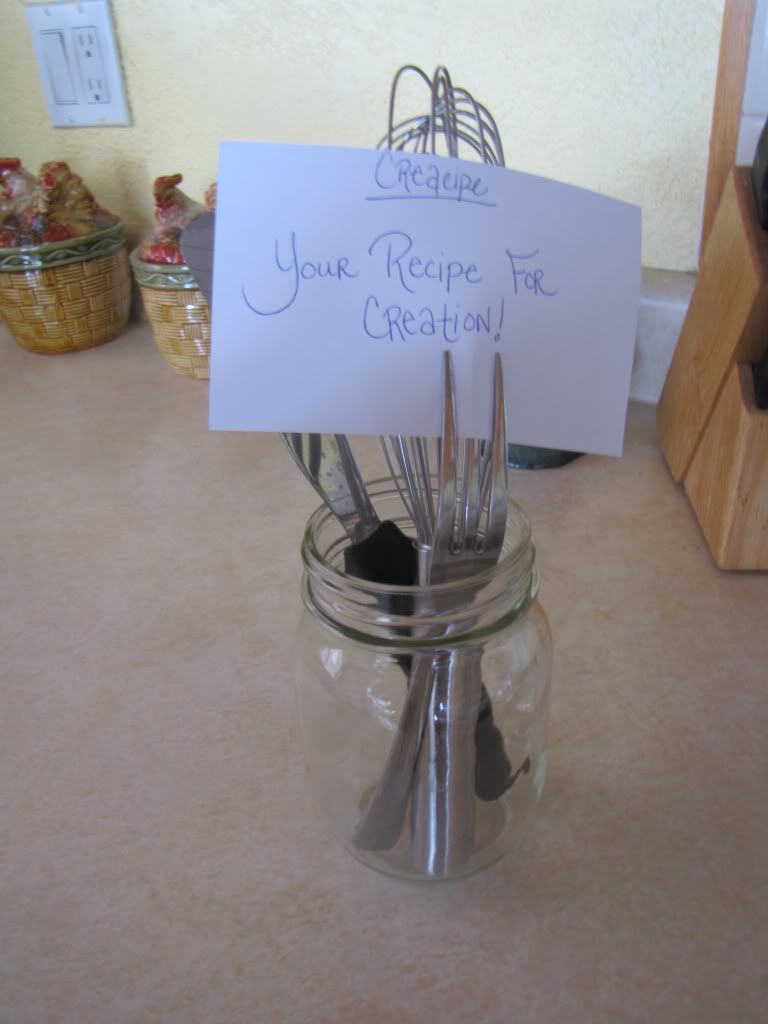
Using a jar in your kitchen to hold utensils is a classic use, but take it one step further--put an upside down fork in the jar and use it to hold a recipe!!! Can't get any easier than that.
We are looking forward to share more fun and easy mason jar ideas with you this week!!!!
Thursday, October 13, 2011
Adding to our Favorite Blogs
Okay!!!! Time to add more of our favorite places for inspiration. I am sure most of you love this blog also. My(Bry's) all time favorite blog is The Pioneer Woman. I have been following this blog for years and if you haven't visited it you must!!! You will quickly see why I have been following it for so long.
Tuesday, October 11, 2011
Crepe Paper Rosettes
Items Needed:
Crepe Paper (a.k.a. Party Streamers)
Hot Glue
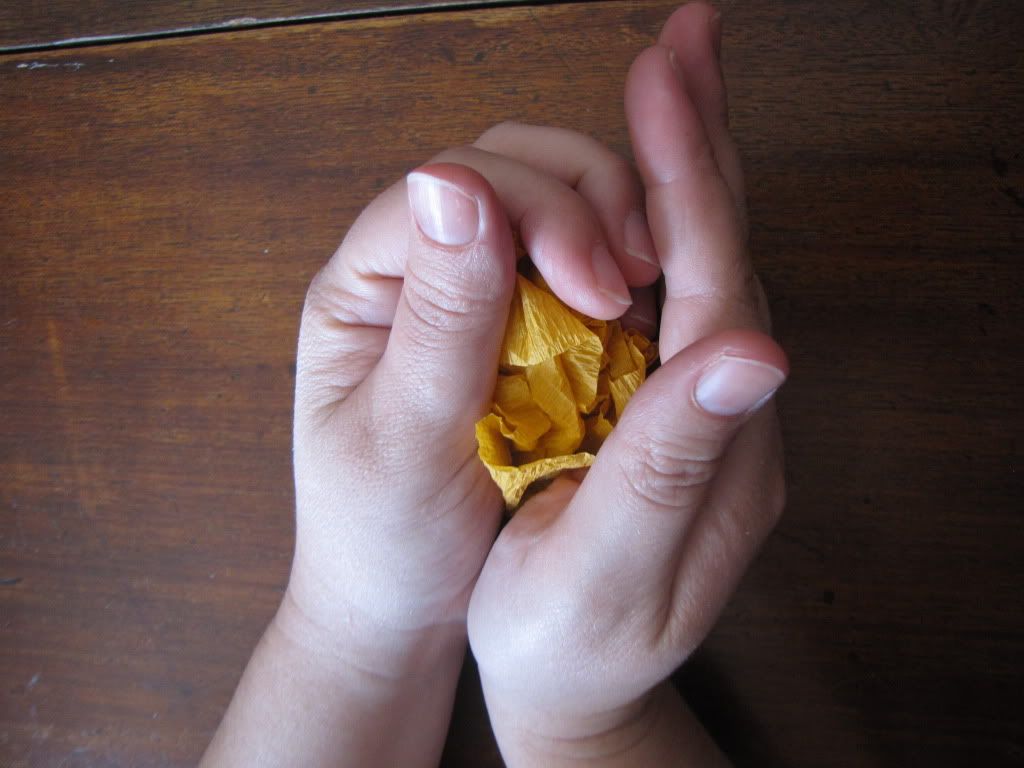
Step 1:
Crumple the crepe paper. To make the paper a little more durable.
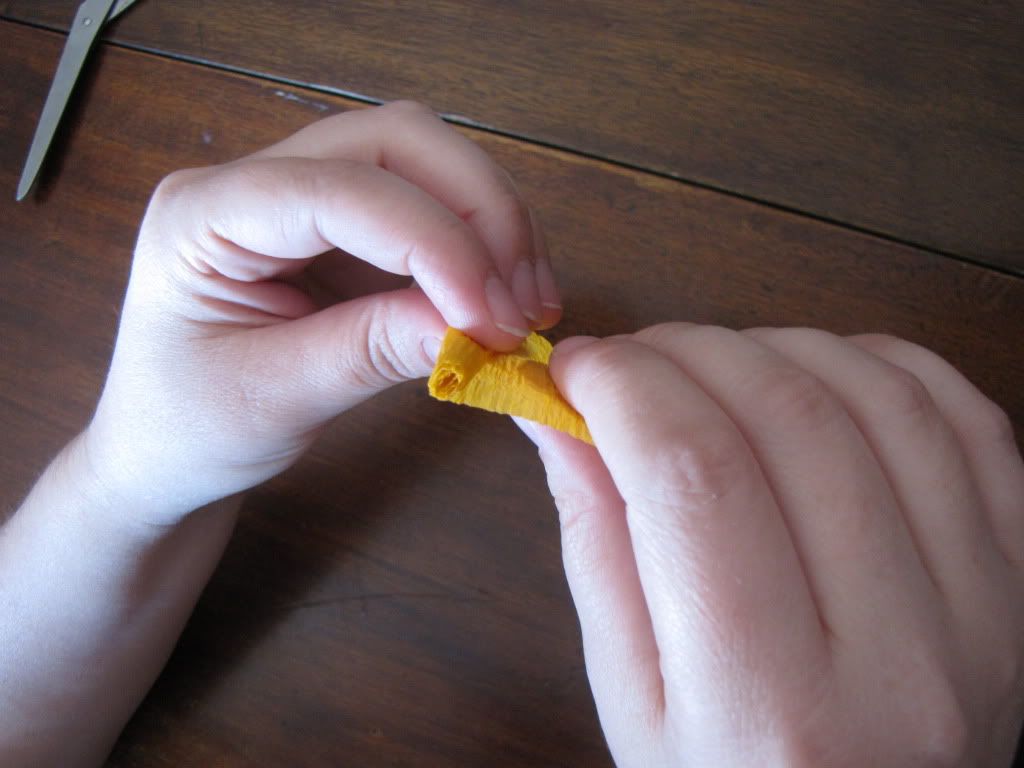
Step 2:
Take one end and roll paper in about 5 times.
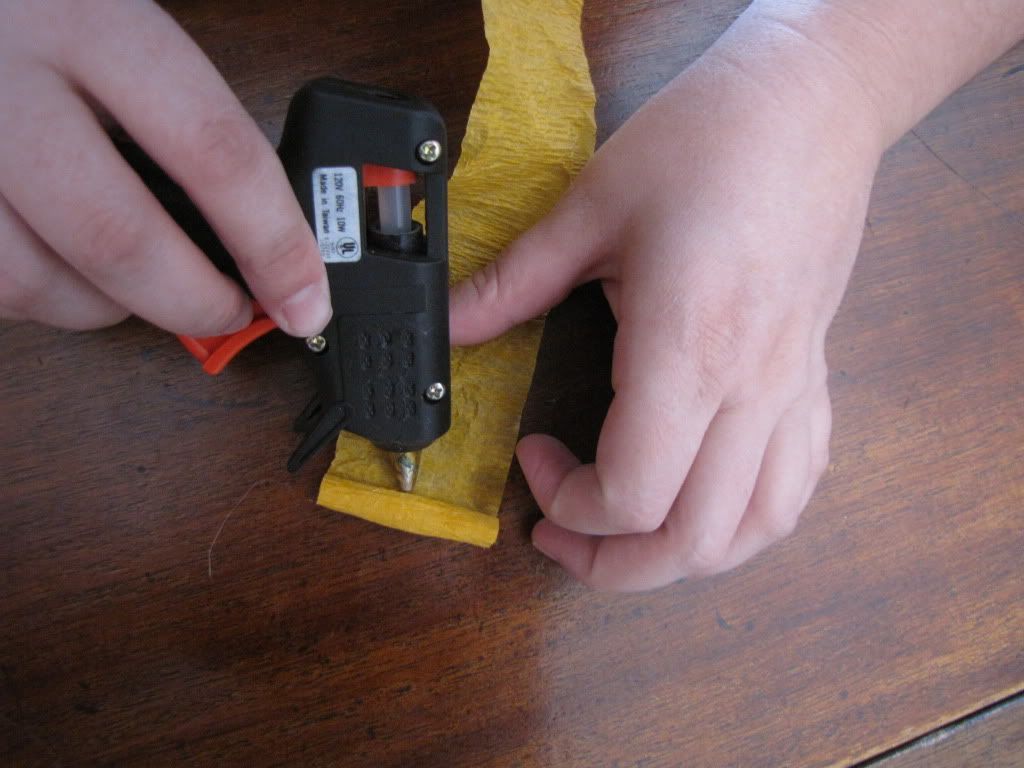
Step 3:
Glue you now have the beginning of your rosette and your paper tail will be remaining.

Step4:
You want to start twisting your tail and wrapping it around the rosette. Keep it tight at the beginning and loosening up as you go. Glue along the way as needed.
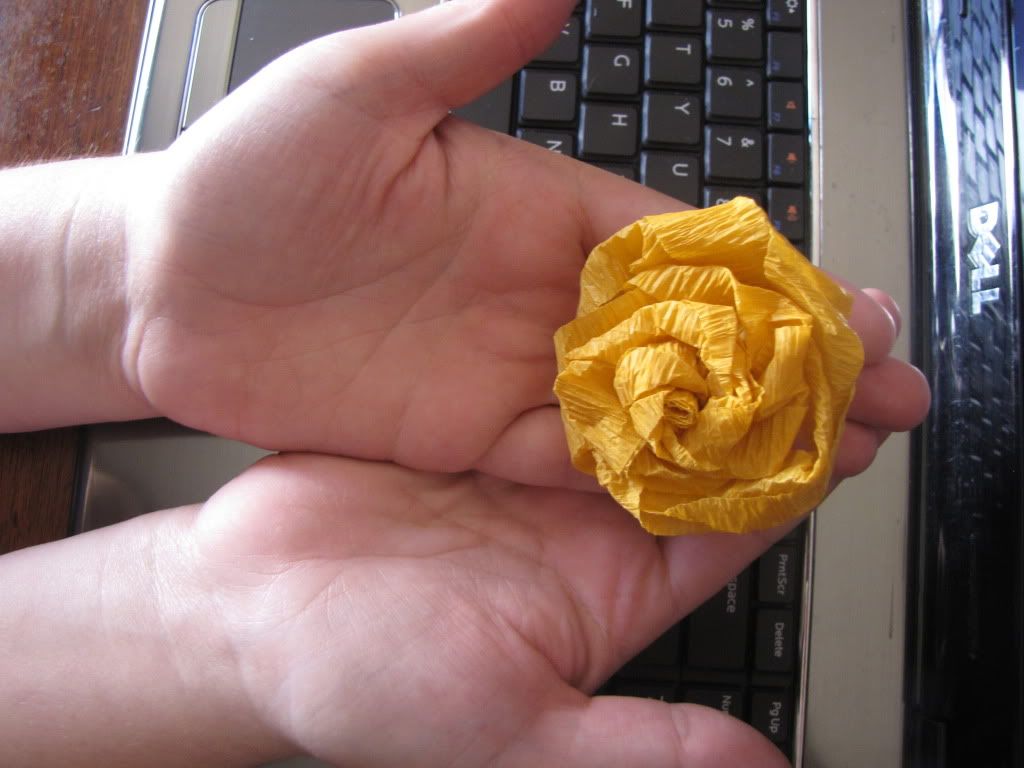
Step 5:
Glue the end securely and fluff up the rosette.
Find another great tutorial on crepe paper flowers here.
Monday, October 10, 2011
Halloween Pictures
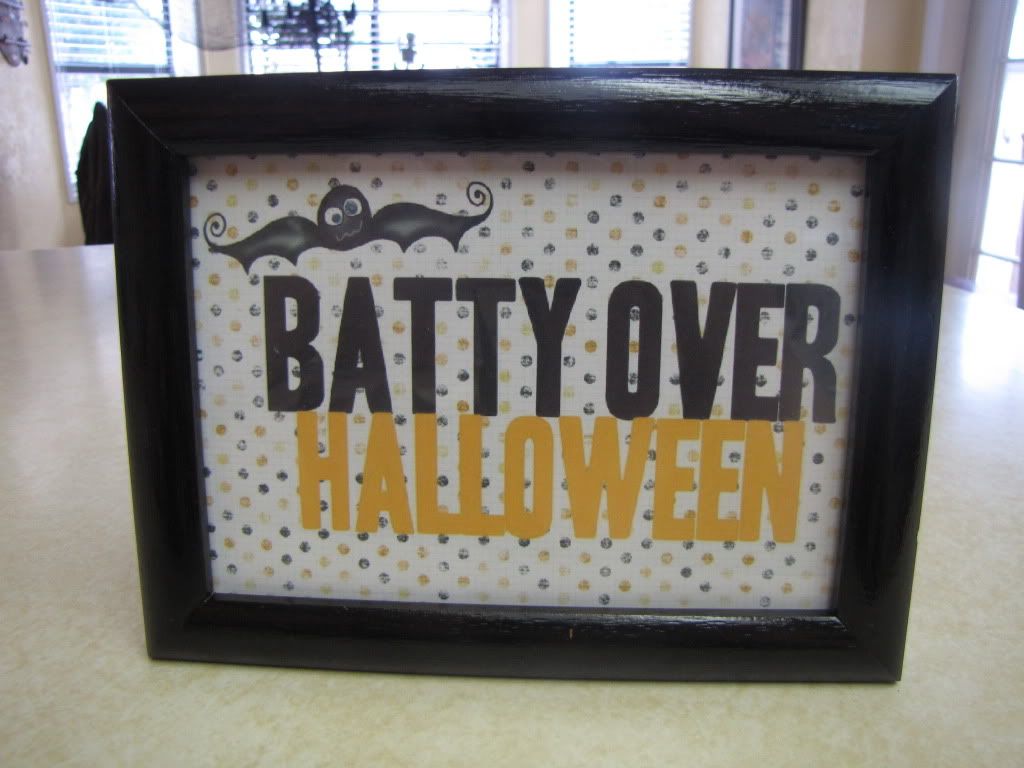
Hey Everyone!!! All of the fall holidays are getting closer!!! Here is a quick little item that will add a little to your Halloween Decor. We just bought an old picture frame for 25 cents, spray painted it black and added a fun Halloween picture. You can find great Halloween images like the one we used at The Bonjour Family
Enjoy!!!!
Sunday, October 9, 2011
Fabric Dryer Sheets
This will save you so much $$$$ and it is really so easy. Just grab so old fabric. It can be anything you have laying around. We used a couple of old flannel pillow cases. You could also use old cotton t-shirts, wash clothes or sheets.
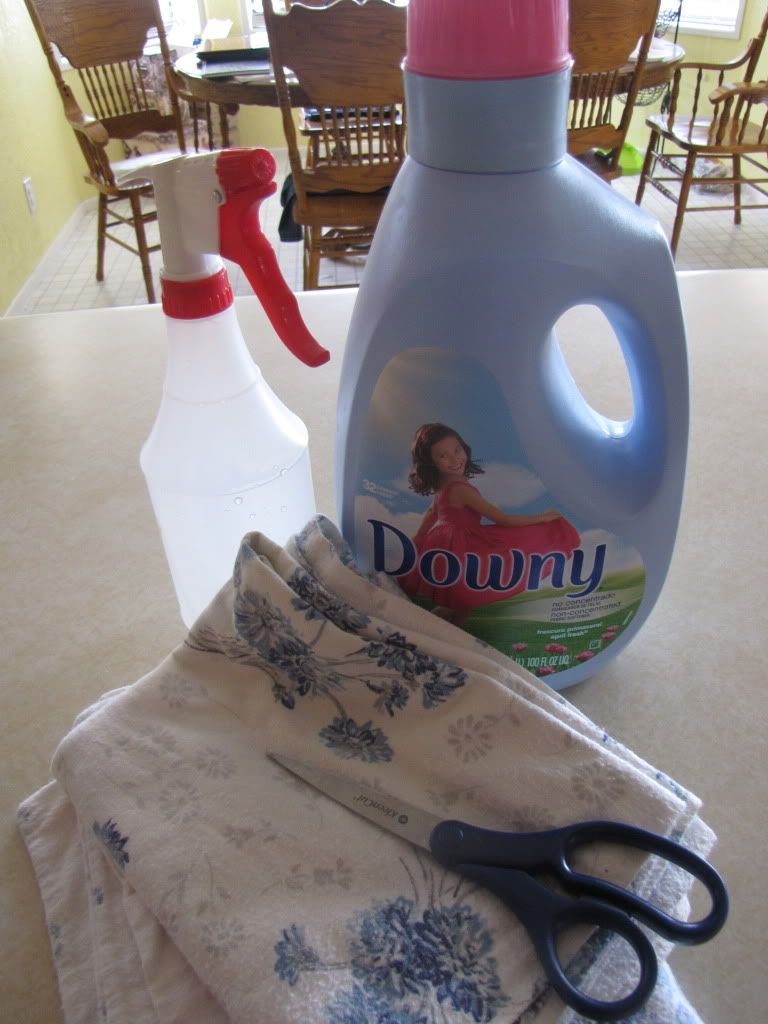
What you will need:
Liquid Fabric Softener
Spray Bottle
Fabric
Scissors

Step 1: Take fabric and cut into squares.
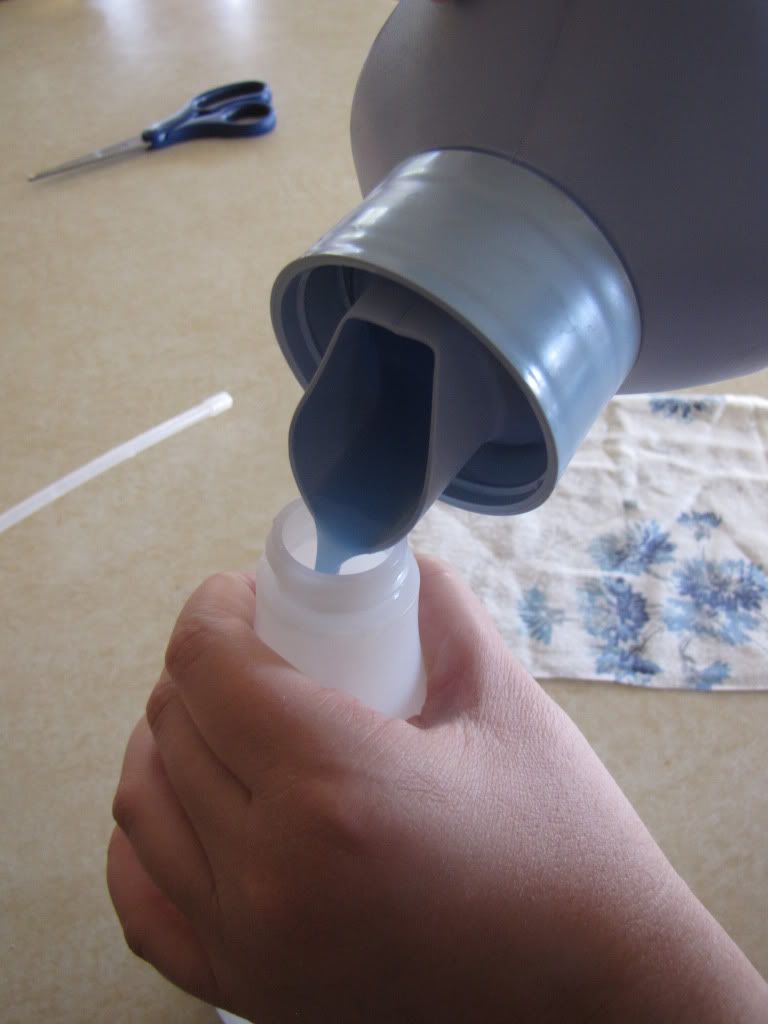
Step 2: Fill spray bottle with fabric softener
*If softener is concentrate add one part softener and one part water
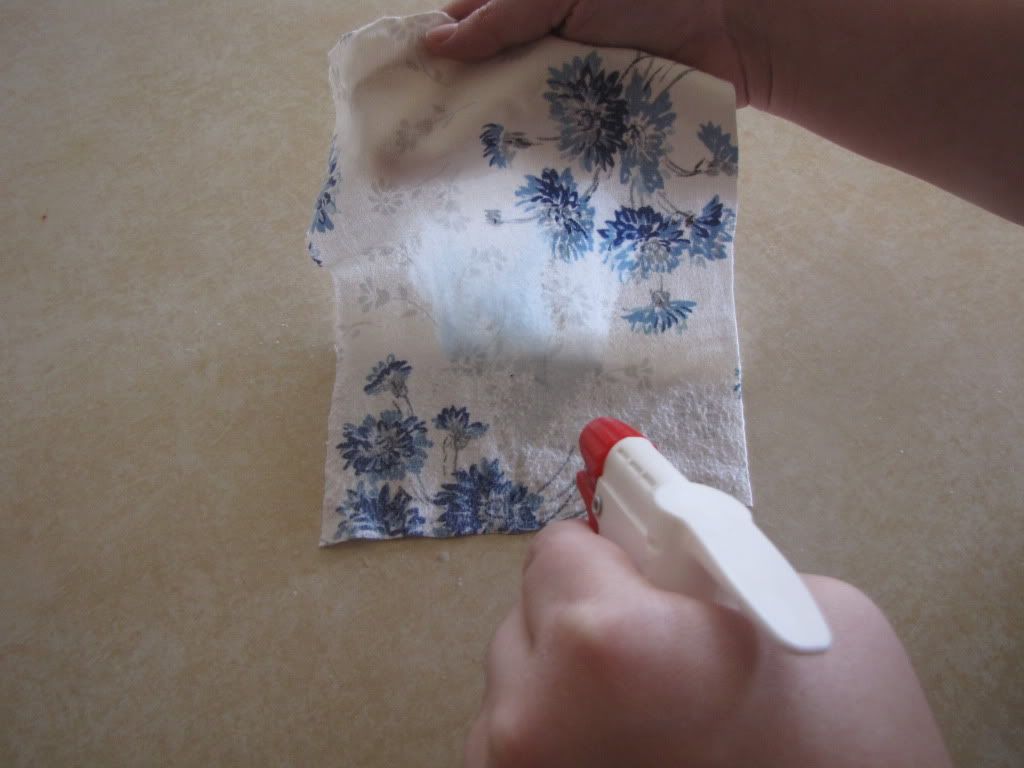
Step 3:Spray fabric with softener
Step 4:Toss in your dry with you clothes Re-spray with each load of wash. Throw in the washer every so often to clean.
Friday, October 7, 2011
Paper Flower-Rosetts
Items you will need:
Card stock
Pen/Pencil
Scissors
Hot Glue
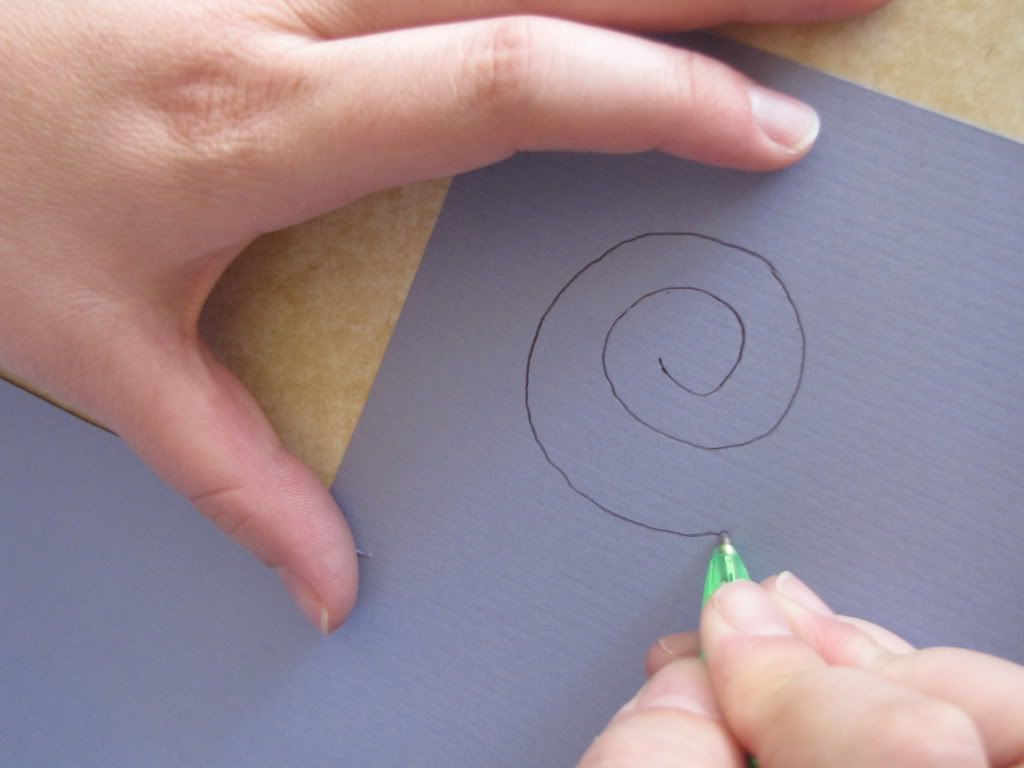
Step 1:
Draw a spiral onto a piece of card stock.

Step 2:
Cut along the spiral that you drew.

Step 3:
Begin rolling and glue when needed.
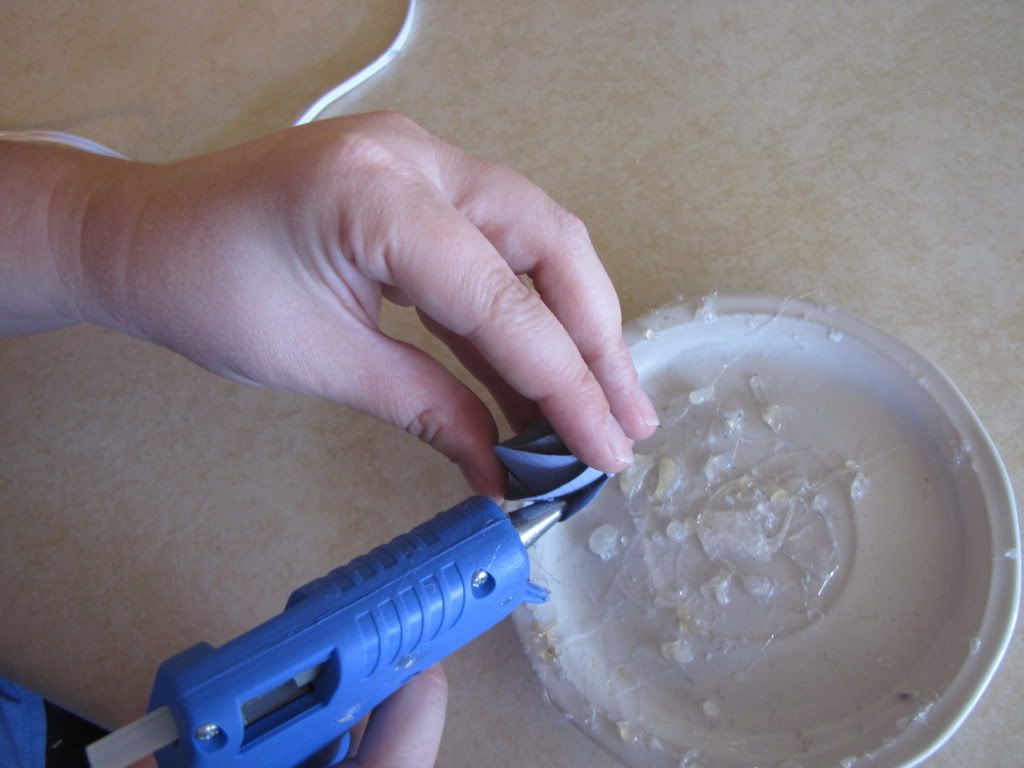
Step 4:
Secure end with glue.
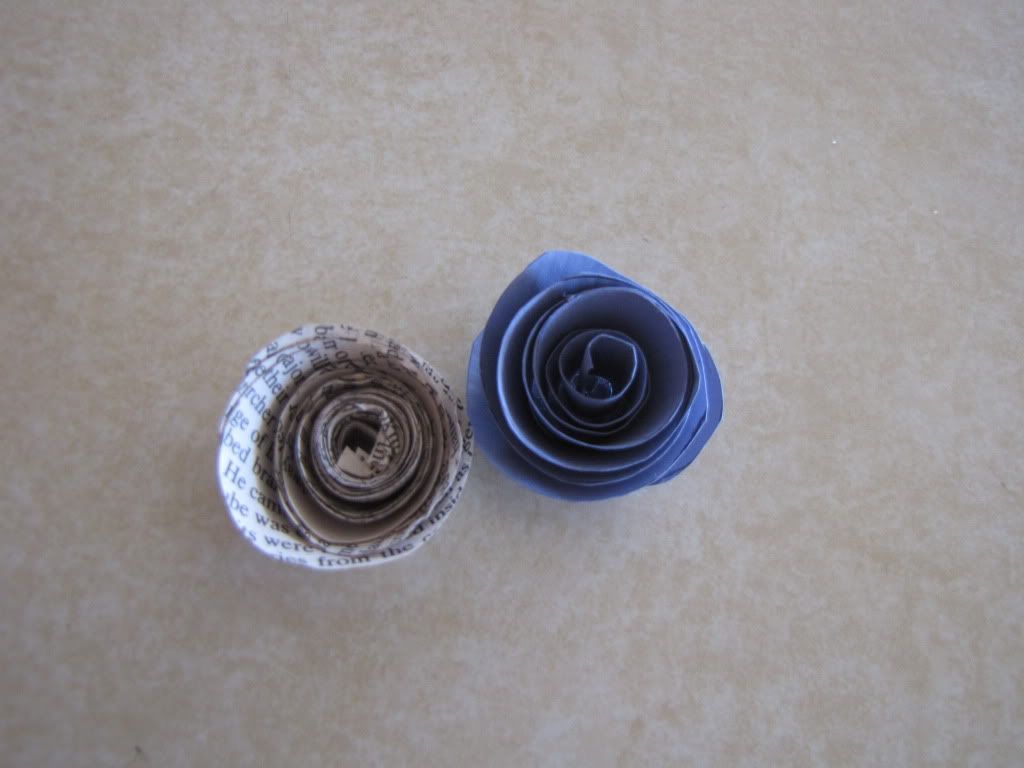
This is what you will end up with!! The possible ways these can be used are endless. You can also make these out of old bookpages. It you use old book pages you will want to use about 4 layered pages together. One piece will not be thick enough. You can view some other great tutorials here and here.
Subscribe to:
Posts (Atom)